Showing posts with label Sewing. Show all posts

Sunday, 14 February 2016

Well Hellloooooooo! I have a new hobby!

Well its been a while, how are you all?

I have a new Job and a New Hobby.  I started my new job last June, its part time in the NHS still, however I now only work mornings which gives me lots of time for my new hobby...

It all started when I decided I was going to treat myself to a new sewing machine (I had been saving up for nearly 2 years). I decided it was going to be something all singing and dancing and something that could do a bit of lettering!  Lots of searching on the internet, I had narrowed it down to a Singer 9960 or a Janome TX607 until one morning I turned on the Create and Craft channel and they were demonstrating a Embroidery Machine. I watched fascinated, think how marvelous it would be to have a machine that could Embroider, just think of all the things I could do!  The price was a couple of hundred pounds more than I was going to spend on my new Sewing Machine, but still nearly £800. Could I justify spending the extra? Lots more searching on the internet followed, and its soon dawned on me that the machine on Create and Craft was in fact Embroidery only, the price of an Sewing and Embroidery machine combined was double at least! Oh well, I thought, there's no way I can justify that amount of money, let alone afford it, until I came across a machine which was Ex Demo/Ex Display and slightly outdated (no USB connection) for less than half price, but still came with full 2 year Manufacturers Guarantee!  Oh My God! Could I possibly justify it, would I use it, much procrastinating, and checking the website to see if it was still there, much discussing with hubby!  In the end I pushed the button and paid for it and 2 days later it was delivered. My new hobby began with my New Elna Xplore Sewing and Embroidery Machine!

My New Pride and Joy

I started with a pack of embroidery threads and a pack of stabiliser, and with the instruction manual on my knee I tentatively hooped a face cloth, pushed the buttons on the display and my first embroidery started to stitch!

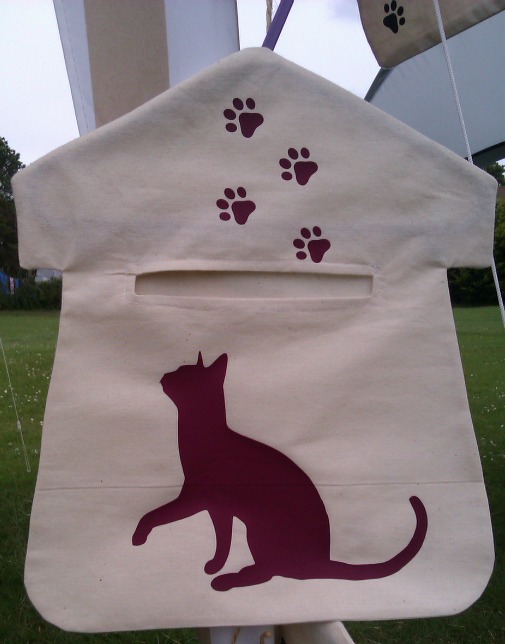
Well, that was 6 months ago and I haven't looked back, I've embroidered Face cloths, Towels, T-shirts, cushion covers, bags, fleece blankets and of course the favorite Item of mine the Peg Bag LOL!

Face Cloths

There's a whole world out there on the World Wide Web of Embroidery websites, I've joined a Facebook group which offers invaluable advice.  I have also found it's quite an expensive hobby, so I am hoping to sell a few items and will be stocking my Esty Shop hopefully very shortly - Braddlebury Crafts

Fleece Dog Blanket.
I love my new hobby, its so addictive.  I'm hoping to add a few more projects here from time to time. I've missed blogging!

Sarah XX

Sunday, 21 July 2013

T Shirt -Re-Size and The London Film and Comic Con

Recently we had a family day out to the London Film and Comic Con. My daughter is the enthusiast for all things Manga etc.,  It was a good day, lots of people were dressed in costume and we enjoyed seeing some Cosplay and memorabilia from various films.

I love the look on this lady's face as she met Alien!

There were also lots of famous people from films signing pictures, notably David Hasslehoff,  'The Smoking Man' from The X files and Danny Glover, from Die Hard etc.,  Lots of Star Trek and Sci Fi Movie stars was there and there were people giving talks, we sat in on the man who voices the Mario Brothers!!! (we needed a rest at that point, but it was interesting).

My daughter wanted a few souvenirs of the day and we bought a few bits and pieces including a manga book and a couple of T-shirts, one of which was a bargain at £2 because all they had left were X-Large!  I suggested we buy one, because I could make it smaller for her... hence this post.

X-Large
I did some research and found a really good tutorial on pinterest
 T-Shirt Resizing

I was a bit hesitant about cutting into the T-Shirt, but I considered it wasn't a lot of money to waste if it all went wrong and chopped away! As you can see, quite a lot of fabric needed removing. This method also allowed us to preserve the Logo on the sleeve, which I thought we may have lost otherwise

I zig-zagged all the seams as suggested and zig-zagged the hem as well, and I and my Daughter are really pleased with the results.

Just Right

Sarah xx


Sunday, 16 June 2013

Strawberry Fayre And Even More Peg Bags

Me and my neighbour had a stall today at the Annual Strawberry Fayre. I don't get much time to make stock, but after the success of my recent peg bags, I made a few extra ones to hang on the stall.

Lucky Black Cat

Campervan

Green Beach Hut

Pink Beach Hut

Mauve Cat

The Pink Beach Hut sold has soon as we had set up the stall, to the stall holder next to us.  And then the Camper Van, Green Beach Hut and the Butterfly!  I would have been chuffed to sell 1, so was over the moon to sell 4!

I also sold some other bits and pieces including a needle case, Hanging Heart with a tilda-esq bunny on it and a felt birdie.  I never seem to sell much at these fayres, but I did almost quite well today!

My neighbour sells hand made Jewellery and did very well as usual.

Here's a picture of my half of the stall.


Despite the rain and it drizzled and poured over the afternoon, it was overall, a successful afternoon.

Sarah xx

Sunday, 19 May 2013

Colour Blocked T Shirts

Whilst browsing the fabulous Pinterest recently I came across this blog post for making your own Colour Block T-shirts which had been pinned, I dutifully re-pinned and went shopping.

I bought my T shirts from H & M for £3.99 each. I have a colour block T shirt previous purchased also in H & M for £9.99 which I love and have worn to death.


I cut the T Shirts using my rotary cutter and pinned and sewed the two halves of each t-shirt together using the zigzag stitch as suggested in the original post.

Please excuse my tubby tummy, I'm working on reducing it!

I gave the seams a quick press with an iron and hey presto I now I have 2 lovely Colour Blocked T-shirts.


Sarah xx


Sunday, 12 May 2013

More Peg Bags

The ladies in my office wanted Peg Bags made. As they are both dog owners and always talk enthusiastically about their dogs, I decided to make the Peg bags doggy themed.

Labrador
I made the Peg Bags out of plain cotton calico and cut the dog shapes out of flocked vinyl with my Silhouette SD machine. I found the dog pictures on the internet and traced them with the Silhouette software and not wanting to waste the excess vinyl around the dogs, I cut out some paw prints too, just to add an extra something to the bags. I have also Ironed a couple of paw prints to the back.

Border Collie
I made an extra peg bag whilst I was at it, and cut a butterfly out of normal T-shirt vinyl, again I cut the smaller butterflies to use up the excess vinyl. The black vinyl is layered on top of the green vinyl

Butterfly
The ladies were both very pleased with the Peg Bags, especially as the dogs were the same breed as their actual dogs. The butterfly peg bag will go into my craft stall stock!

Sarah xx

Sunday, 5 May 2013

Beach Hut Peg Bag

We need a new peg bag! The old one is a bit weathered and the pegs keep falling out of it!

I have made peg bags before, so I looked out my old pattern, which I had previous drawn up.  However, being me, I decided to make something new!

I've always liked the Beach Hut as a quirky design, so decided to base the Peg Bag on it.


I used some stripy fabric and did a bit of applique for the door and life ring (buoy), I made the roof separately and stitched it on after I had stitched the bag together.


I think I need to make it look a bit more beach hut like, at the moment, its a bit Garden Shed, except for the life ring, perhaps a Bucket and Spade would help, or some pastel colours.

However its is perfectly functional the way it is, and my husband and daughter said it looks like a beach hut.

Sarah xx

Sunday, 28 April 2013

Doggy Treat Bag

My sister in law asked me to make her a 'Doggy Treat Bag' after the one she had bought fell apart.  The one she had, had a draw string top and a large clip to attach it to your belt. Unfortunately the lining was quite cheap and frayed badly, hence fell apart.


She asked for the bag to have a cross body strap on it instead of a clip. Having given it a bit of thought I decided to create a bag with a flap and button closure, and I lined the bag with some waterproof lining to avoid smells etc,


I didn't use a pattern and winged it a bit, however it is just an oblong piece of fabric cut with a point at one end, and folded up to make the bag and pointed end folded down to make the flap.

The piece of gingham sewn on the front forms a pocket and the flap is also lined with the gingham. I finished off with a button hole, self covered button and matching strap.


This is the lucky dog whose treats will be contained in the bag, he was about 6 weeks old in this picture. He is now at least 4 times as big and still growing.

I hope my sister in law likes it, I have wrapped it up and sent it to her to open on her 50th Birthday. 

Sarah xx

Saturday, 6 April 2013

The Great British Sewing Bee

I've just finished watching the first episode of this new programme, it was on last Tuesday on BBC 2, however I recorded and watched it latter as it clashed with Holby City!

I was intrigued and excited to see a programme about sewing with members of the public, albeit the "cream of amateur sewers" competing to make the best items. I enjoyed Project Catwalk when it was on a few years ago, which was way beyond my skills with pattern designing and drafting, but the "Sewing Bee" sounds like much more my level!

I understood the programme would take a similar format to 'The Great British Bake Off' and it did!  The first challenge was to make an 'A line'Skirt from a provided pattern in 3 hours.  The 2nd task was to alter and embellish the neckline of a simple top in 1 hour. And the 3rd task was to make a dress from a pattern of their own choosing, but to fit it to a live shapely model in 7 hours.

One sewer got sent home, having not proved herself, a 2nd contestant was supposed to go too,  but one had already gone home sick, so will be allowed back next week.  I personally would have sent a different contestant home from the results I could see!  But they seem to gloss over some of the contestants finished items, so I couldn't particularly judge.

I'm not sure that they really have the 'Cream' of amatuer sewers, but there again I'm not sure that  I would do a perfect job given the time restraints.  I shall be watching again this week, as although I have been sewing for many many years, I have learnt a thing or two... namely invisible zips! and I shall be buying an invisible zip foot for my machine.

Of course there is a book to accompany the programme, reviews appear good!  


Sarah xx


Sunday, 24 March 2013

Sewing Companion Case

I couldn't resist this little Sewing Companion Case when I came across it, whilst browsing Pinterest

Sorry my photography isn't the best!

I was was also very happy to find it is a one piece pattern, I love uncomplicated patterns!  I'd bought the Balloon fabric on a trip to a craft show at the NEC in Birmingham over a year ago, and teamed it with the pale blue polkadot fabric, which I thought made an excellent contrast.


Once the 2 fabric pieces, plus some soft iron on interfacing, are sewn together and turned out the right way, some nifty folds form the pockets.


You can (just) see the stitching which holds it all in place on the back. 


In my haste to make this, I forgot to check that my needle work scissors would actually fit in it. And this project was sadly left unfinished for some time. So my top tip is to measure and adjust the size of the pattern to your scissors before you start. The instructions say 4" Scissors should fit, mine are 5".


However, I loved this little Sewing Case and wanted to use it, so I found it is perfect for my Nail Scissors and clippers, the emery board is a little long, but I'm sure I can find a suitably sized one. So, I finished this project with an old fashion popper, and it now sits in my work box, where I can find it when I need a manicure!

Sarah xx

Sunday, 17 March 2013

Patchwork Cushion Ta-Dah...

I finally finished my Patchwork Cushion...


 You may remember my post here - Brand New to Patchwork.

I made the back of the cushion in the same fabric as one of the squares and it came out better than I thought it would.


I have concealed the zip under a flap on the back. And used a cushion inner which is bigger than the cover to give a nice plump look!


I'm quite pleased with my first attempt at Patchwork, I haven't done any more yet, but I think I will!

Sarah xx

Online Quilting Classes

Friday, 8 March 2013

Pouffe!

I had an urge to make a Pouffe!  I'm not sure if I came across this picture on Pinterest first or whether I searched for a pattern first, but I had one in mind for my husband's Christmas present, but never found one to buy, and didn't have time to make one, then!

Pouffe Pattern on www.bhg.com

Last week, I searched and found the free pattern again via Pinterest on www.bhg.com (you have to sign up to download the pattern) and then trawled my cupboard for a large enough piece of fabric (2 metres). Luckily I had quite a lot of fabric left from when I made my curtains 20 years ago.


I wasn't sure that the fabric lent itself to the to the pouffe, however after some deliberating and laying the pattern on vertically and horizontally, I decided to cut across the stripes and be extra careful when pinning and sewing, to make the stripes match.  I also put a zip in one of the seams, as I thought it would be easier to fill the pouffe with Bean Bag beads and zip it shut instead of try to sew it whilst the beads were popping out all over the place, plus it will make it easier to add more beads when it needs topping up.


It was quite quick and easy to make, took me an evening to print the patten and cut the 8 pieces and took me an afternoon to pin and sew the pieces together. I omitted the octagon piece on the top of the and bottom of the finished pouffe, and of course omitted the stitching on the original pattern.  I am toying with adding a covered button in the centre.

I need to buy some more Bean Bag beads and this is actually about 4/5 full and just needs filling right up to give it the full shape of the original one. I may even make another one in a different fabric (I fancy some Chenille or Velvet) and fill it with some hollowfibre stuffing for a more solid shape.  However this one is very comfortable and supports my legs nicely when relaxing on the sofa, my husband loves it too!

Sarah xx

Thursday, 21 February 2013

Brand New To Patchwork

Its been a while, and was going to wait until, I had finished this project, however...  I haven't finished, but I thought I would show you my efforts so far.


This is my first attempt at some patchwork quilting. I have been reasonably interested in patchwork for a while, and decided a Cushion Cover would be easy to start with.


I found some co-ordinating fabrics deciding red should be the theme throughout, and checked some blogs for inspiration. This one told me what I wanted to know! The striping method appealed to me. An another blog I read told me about sewing them all together in to a tube, cutting across the seams and then unpicking the seams to make the squares come out in a different order, but I can't find the blog I'm referring to! I'm sure the patchworkers/quilters amongst you will know what I mean!


I'm quite pleased with the outcome, it was a pleasant Sunday afternoon spent cutting and sewing.  I will be finishing this project soon! Watch this space!

Sarah xx


Wednesday, 6 June 2012

A little bit of dressmaking

I recently decided to do some dressmaking.  Something I used to do a lot of when I was a lot younger.  In fact the last thing I made for myself was my wedding dress and that was 17 years ago!

I had some material which I had bought for crafting, however the piece was 5 meters long and there is plenty for crafting as well as making a top for myself.  I was going to down load a pattern from the internet, however I decided to check out the new haberdashery department at John Lewis and found myself perusing the dress making patterns.  £5.95 later and I had my pattern.  I chose a fairly easy one.  I wanted to ease back into dress making.


It didn't take too long to cut out the fabric,and it didn't take too long to sew everything together.  I completed the project over several days, but I'm sure it would have taken an afternoon from start to finish.

I decided to do French seams as it hides all the raw edges. 


A close up on the button detail and front gathering.

I enjoyed my revisit to dress making so much, I might just do some more.... when I have time that it!

Sarah xx

Sunday, 13 May 2012

100th Post and a Little Owl

I have been meaning to post for a while, I noticed I was up to post no. 99, so this is no. 100 congrats to me LOL!

I browse Pinterest from time to time and of course anything of interest I repin...  I have noticed that sometimes pictures have been hi-jacked and lead to something totally different, so I always check the link before I re-pin! (Its a bit naughty of Pinterest to allow this, don't you think?).

One of the items I pinned was this lovely little owl cushion/softie. 

It has taken me some time to make this, I started it a couple of weeks ago, however in between an extremely busy week at work and having some time to myself this afternoon, I finally finished it.


I decided to hand applique the pieces using a variety of stitches, just to see which worked well and which didn't. I added some hearts to the body and I lost the original beak template so I just cut out a triangle, all be it a bit small, however I am relatively pleased with this.  I am tempted to make another and double the size of the pattern to make a large owl cushion. Alternatively I might applique the front of the owl to a cushion square!

Sarah xx

Wednesday, 14 March 2012

Credit Card Wallet

My mum mentioned the other day that she wanted a little holder for credit card and store cards.  We happened to be in TK Maxx at the time and we couldn't find one and I little voice in my head said, I could make one...  Mum was soon distracted by a pair of shoes and I hatched a plan.

I scoured the internet for ideas and patterns, and decided on drawing up my own.  I rifled through my fabric cupboard and picked out some likely candidates.

A few hours later, the time it took hubby to take the kids to the cinema to see the latest Disney offering 'John Carter' (funny I used to work with a John Carter, and there was a John Carter in ER,  OOoooo Noah Wyle). a'hem... I had made 3 credit card wallets.

The first, not bad, but too much iron on interfacing, I interfaced every piece of fabric and its just too bulky. I also forgot about a tag or elastic to hold it closed. I haven't included a photo of this one as it is very similar to my third effort!

The second, I only interfaced half the fabric, so turned out quite well, however I miss measured the top card pocket and the Credit Cards sit level with the edge, which I decided is not ideal, I also decided the outer fabric is upside down and the Elastic/ Button is on the wrong side.


Third attempt.... Just Right.


I am going to make another one, as I really like the finish of the fabric, the second attempt was made from.  It is a Japanese Linen Mix FQ that I bought at the MK Handmade and Vintage Fayre. I will attempt to photograph the steps and make a little tute for you.

Sarah xx

Thursday, 3 November 2011

Felt Novelties Part 2

It was a colleagues 50th birthday recently at work, and her immediate work mates had clubbed together to buy her a Radley Handbag.  Of course I was inspired by the Scottie Dog logo, and set about making a bag charm.  Using a pattern from a previous project, I cut out 2 halves in contrasting colours and blanket stitched them together and was going to leave it flat, but in the end decided to lightly stuff it.


I didn't like it left plain, so I cut out the felt hearts and embroidered them on to the sides, and chose the beads for the eyes.

Finally I made the collar and lead out of a piece of fine ribbon and attached to a lobster claw.


Wendy seemed really pleased with her Scottie Dog and hung it straight onto her handbag!

The photos were taken with my mobile phone at work as I forgot to take a picture at home.

Sarah xx

Monday, 31 October 2011

Handmade Felt Novelties Part 1

I sat on the sofa one evening and was inspired by my daughters notebook which had owls on it.  I started by sketching a rough idea, and then got out my wool mix felt to select the colours.

The main colours are blue and pink with big yellow felt and black embroidered eyes. I sewed all the parts together with a blanket stitch and stuffed it lightly with hollowfibre! The little beck stands slight proud, which was achieved by sewing the sides closer together so the beak was pushed out.


I think I need to do a little more to the wings and tail feathers, and will probably add some coloured felt feathers and embroider them on some how... another job for when I'm sat on the sofa watching tv.

I'm quite pleased with myself for making my own design instead of copying someone elses!

Sarah xx

Friday, 16 September 2011

Fabric Strawberries (Pin Cushions!)


Another thing I have been meaning to make for ages is Fabric Strawberries.  I'm sure I have seen lots on t'internet... but I decided to follow this pattern from Embroideroo.


Again I have used red fleece and also made one out of normal fabric.... just to see how it turned out.  I found the fleece lent itself very well as it has a little more give in it to shape itself to a strawberry.  The fabric one turned out well too, but the fleece is very tactile.


Attaching the felt leaves gave me an opportunity to use my hot glue gun, and I was rather pleased with the result, although I could do with a bit more practice with the gluing and rolling up the stem without getting the glue all over my fingers and everywhere else. I am still toying with making some more and adding some embroidered pips to the fleece version.

Sarah xx