Showing posts with label Silhouette SD. Show all posts

Sunday, 22 September 2013

Lanterns for a Silver Anniversary Party

It was my Brother and his wife's 25th Wedding Anniversary in August, and I offered to make some lanterns to hang around the garden.


There was plenty of inspiration on the internet and Pinterest. However I decided to personalise the lanterns using my trusty Silhouette SD to make a stencil, and some etching cream to etch the design into the glass.

As it was a Silver Wedding, I used Silver ribbon to decorate and hide the wire used for the handles. and I found some silver coloured granules to put in the bottom of the jars. I also had a bit of brainwave and applied a thin layer of glue and sprinkled glitter onto the stencil, before peeling the stencil off. I think it turned out rather well.


The twinkly effect of the glittered lanterns was lovely with the candles lit as the sun went down.

Sarah xx

 .

Sunday, 16 June 2013

Strawberry Fayre And Even More Peg Bags

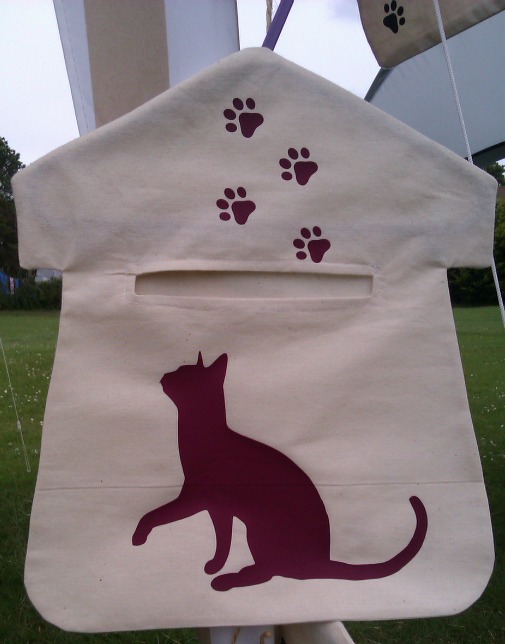
Me and my neighbour had a stall today at the Annual Strawberry Fayre. I don't get much time to make stock, but after the success of my recent peg bags, I made a few extra ones to hang on the stall.

Lucky Black Cat

Campervan

Green Beach Hut

Pink Beach Hut

Mauve Cat

The Pink Beach Hut sold has soon as we had set up the stall, to the stall holder next to us.  And then the Camper Van, Green Beach Hut and the Butterfly!  I would have been chuffed to sell 1, so was over the moon to sell 4!

I also sold some other bits and pieces including a needle case, Hanging Heart with a tilda-esq bunny on it and a felt birdie.  I never seem to sell much at these fayres, but I did almost quite well today!

My neighbour sells hand made Jewellery and did very well as usual.

Here's a picture of my half of the stall.


Despite the rain and it drizzled and poured over the afternoon, it was overall, a successful afternoon.

Sarah xx

Sunday, 2 June 2013

A Ruby Wedding Gift

It was my very good friend and (Bon Jovi) Tour Buddy's Ruby Wedding Anniversary last weekend, and I decided to take her some flowers!

I bought a plain glass vase from Ikea, and etched it with some Amour Etching Cream.  Using my Silhouette SD to cut out a stencil from vinyl, it was quite tricky applying it to the curved surface, but I managed.

Difficult to see Etching

I've taken a photo, but I forgot to take a picture before I arranged the flowers in the vase, so its a bit difficult to see the etching.


I added some ruby red glass pebbles to the bottom of the vase and finished it off with a tag made with a lovely Ruby Red Rose Print from the Graphics Fairy.


In return for her lovely Flowers in an personalised etched vase,  I was treated to a lovely home raised spit roasted Lamb Dinner at her Ruby Wedding Party held in the Barn at her Farm!

Gorgeous Flower

Sarah XX

Sunday, 12 May 2013

More Peg Bags

The ladies in my office wanted Peg Bags made. As they are both dog owners and always talk enthusiastically about their dogs, I decided to make the Peg bags doggy themed.

Labrador
I made the Peg Bags out of plain cotton calico and cut the dog shapes out of flocked vinyl with my Silhouette SD machine. I found the dog pictures on the internet and traced them with the Silhouette software and not wanting to waste the excess vinyl around the dogs, I cut out some paw prints too, just to add an extra something to the bags. I have also Ironed a couple of paw prints to the back.

Border Collie
I made an extra peg bag whilst I was at it, and cut a butterfly out of normal T-shirt vinyl, again I cut the smaller butterflies to use up the excess vinyl. The black vinyl is layered on top of the green vinyl

Butterfly
The ladies were both very pleased with the Peg Bags, especially as the dogs were the same breed as their actual dogs. The butterfly peg bag will go into my craft stall stock!

Sarah xx

Sunday, 14 April 2013

Blue Booties and A Campervan T Shirt

Just a quick post this week, to show off the Blue Booties which I had to crochet quickly due to the chap at work having had a baby boy! (I was sure it would be a girl - pink booties here).


This is the last time I will post about crocheting booties (for now! LOL)


I also completed a project with my marvellous Silhouette SD, for my Brother in Law, who requested a Campervan T shirt, after seeing the West Ham one I made for my husband.  Brother in law Terry is a Chelsea supporter, so of course the Campervan had to be in Blue and White and with a Chelsea Logo.


I was really impressed with the way the Silhouette coped with the intricate design of the logo at quite a small size. (The cat logo is already on the t-shirt, which Terry provided me with).

I love my Silhouette machine and must do some more projects with it.

Sarah xx

Sunday, 30 September 2012

Silhouette Campervan Tee

Hello, Its me, its been sooooo long, my apologies.

 I am still crafting, albeit not as much, but I just don't have as much time.  I work as part time Bank Staff at my local Hospital and my job is being made permanent. I have to apply for it, but I have asked that if I do get it, I do a few less hours, so hopefully I will have a little bit more time for things I want to do, such as crafting and blogging.

A while ago I was playing with the Silhouette Software with a picture of a Campervan, my hubby, said it would look good in West Ham colours on a T Shirt, so with a bit of jiggery pokery, I bought some iron on vinyl in the appropriate colours and change the logo in the middle and voila, one West Ham Campervan T Shirt.

My hubby loves it and wears it whilst watching his favourite team play!


Sarah xx

Monday, 9 April 2012

Silhouette Easter Cake

I hope you all had a lovely Easter...

My daughter made a lovely Chocolate Cake to take to our relatives... we had been invited for dinner.

I couldn't resist an opportunity to use my Silhouette SD machine to make a decorative band to go around the outside.

I had searched the internet for ideas or a pre-made design, but could only find Cup Cake Wrappers.  I didn't have a lot of time to look, so I made my own.  I used the trace facility to get the rabbit shape from a picture I found on the net,  and used the flower which comes with the software.  The scalloped border is just some circles in a row and merged on top of a rectangle. And then some smaller circles inside the scallops. After cutting it out from yellow paper, I just lined it with the green paper and some grease proof paper.


The cake was received well and looked lovely on the table for the 2 minutes before it was sliced up and eaten.

Sarah xx

Monday, 7 November 2011

Space Invader T-Shirt - Silhoutte SD

My daughter wanted me to make her a t-shirt with my Silhouette machine, so I bought a couple of plain t-shirts and waited for further instructions...

Whilst I was browsing on a font website.  I was randomly typing in words and looking to see what fonts came up, a Space Invader Font appeared (This is a great website for fonts).  My daughter who was watching over my shoulder, saw it a said a Space Invader T Shirt would be great!   So I downloaded the font and installed it.  We opened up the Silhouette software and typed out the Space Invader font in Alphabetical order so my daughter could select which figures she wanted on the shirt,  she opted for a traditional space invader layout.

We cut each section of the design out in a different colour of the heat transfer vinyl and arranged and ironed them onto the t shirt.

The results are rather pleasing...

Sarah xx

Wednesday, 26 October 2011

A Chance to Play with my Silhouette SD - Halloween Bunting


As it is half term and the kids are at home, I have taken the week off work and had a chance today to get out my Silhouette SD machine. Amongst other projects I decided a little Halloween decorating wouldn't go amiss and thought I would have a go at making some card bunting.

Please ignore my fingers shadows

The Silhouette website have very conveniently had some free Halloween shapes to download recently, so I used these for the detail.

In Silhouette

Using the Sihouette SD, I cut the Flag (triangle) shapes from an A4 sheet of grey card with the Pumpkin Face and the Spiders Web. I was quite chuffed with how they turned out, but my daughter said the pumpkin needed some orange. So I cut out the pumpkin itself with face.  and stuck them on the flags too!  I decided we ought to have a spider on the webs, so found a spider and traced, printed and cut out 3 and stuck them on too!


I couldn't find my string, so used a length of black knitting wool to hang the flags on, I tried to staple the flags on which wasn't very successful, so ended up with a bit of sticky tape on the back too!

Sunday, 11 September 2011

Silhouette Snoopy Nightdress

I have been a huge fan of Snoopy and the Peanuts cartoons for as long as I can remember.  I have also worn Nightdresses with Snoopy on them too for as long as I can remember.  My last one needed replacing and a quick look in the usual shops was fruitless...  Alas!

Of course, it didn't take me long to realise I could make my own Snoopy Nightdress using my Silhouette machine.  So on a shopping trip to the local market I found a suitable oversized T-shirt for just £2.00.  I scanned the good old internet for pictures of Snoopy in all his glory and found one including woodstock...  having copied and traced the picture in the Silhouette software, I added the word Snoopy and chose a suitable font. The extra flowers came about because I hate wasting the iron on vinyl (just one of those things really...) but I think they enhanced the overall result.  When I cut it on the silhouette I used the setting for Iron on Vinyl, but it cut a bit too deep and through the backing too! I was worried it was all going to fall apart.  Luckily it held together enough to let me weed it (peel off the excess vinyl) and then position and iron it on to the t-shirt.  I cut the yellow vinyl for Woodstock by hand and ironed it on to the t-shirt first. and then ironed the main image over the top, which is a deep purple as I didn't have any black.

I set the iron slightly hotter than before and I think it worked much better (I did a test, by ironing a small flower on the reverse if the t-shirt first).


Here is the result of my mornings work.  I am extremely pleased with how it has turned out....


Sarah xx

Tuesday, 16 August 2011

Silhouette SD Envelope

Of course I needed an envelope to go with my birthday cards and found a free template to use.  The size of the card dictates the size of the envelope. My card was too big for an envelope cut from an A4 piece of paper, so after a bit of trial and error, I successfully cut one the right size from 2 A4 pieces.  I managed to join the pieces more or less at the fold of the base of the envelope, and I added perforated lines at the folds to make folding easier.

The end product looked pretty good!

Sarah xx


Sunday, 14 August 2011

Silhouette SD Birthday Card

I had 2 friends with birthdays recently so, I'm of course I thought this was a great opportunity to try out making birthday cards with my Silhouette. I'm not a card maker but, I thought somehow this was going to be easy, I downloaded a template design from the Silhouette Shop.  Unfortunately the template didn't come with any instructions (there may be a general tutorial, but I'm too impatient to look).


Anyway, I cut the design the way I thought it should be and this was the result...


Somehow, its not quite right, I kept looking at the template and the picture of the design and wasn't quite sure how it was supposed to go together, it was quite fiddly and all the pieces had to be stuck individually, there is another piece which I haven't used here. I didn't like the paper I used either!

Then I thought I can design my own happy birthday message,  and use the template shape to border it....  This was the result, made with  metallic card.


This was closer to what I was expecting... So having done this I thought maybe, if I layer the border over the words, it would cut them out together...


I think I may have cracked it... although I re-sized the design to make it smaller that the actual card and have got the resizing wrong, I am much happier with the result although I'm not sure if this is totally the way the designer intended it to be.  And as this is for a female friend I added a Butterfly, also cut with the silhouette to feminize the card a bit.

I was very impressed with the Butterfly, it was a large template and I reduced it quite small, the silhouette coped really will with cutting the delicate bits.

I don't intend to make lots of cards, but with a bit of practice I think I could make a few fairly passable cards for the odd occasion!

Sarah xx


Thursday, 21 July 2011

My First Silhouette Project

I couldn't wait to try our my new Craft Robo Silhouette SD. I really want to cut fabric with it. So with a bit of research and an idea forming in my mind, I gave it a go!

I go line dancing once a week, and we wear dance trainers, so I had in mind to make a bag to carry the shoes and decorate it with a design cut on the Silhouette. So I set to choosing a font and welding the letters together (so it cuts the whole word together and not each letter individually) using the software that comes with the Silhouette. Its quite easy to use and it didn't take me long to work out how to use the tools etc.,  and there are plenty of tutorials and help out there in the world wide web.

I ironed some HeatNBond lite to the back of a piece of scrap material. And set the Silhouette to cut!  This is where I came unstuck!  After the 1st attempt to cut out the design, it wasn't quite right, the backing paper stuck (and I mean stuck, there are still bits of paper stuck on it now!) to the carrier sheet and the fabric wasn't cut right through. I realised I hadn't set the cutting settings right and found there is a setting for fabric, so I tried again, the 2nd attempt wasn't much better in fact worse! The material was coming away from the backing paper and getting all tangled up in the machine.  Disappointment was setting in fast!  However not to be beaten, I studied an on line tutorial and couldn't quite figure out where I was going wrong until I looked at a picture of the fabric being peeled off the carrier sheet, it had the HeatNBond ironed on to it, however the backing paper had been removed before cutting! Hallelujah!  Third time lucky - a perfect cut!

I also cut out a flower design from the library of designs that came with the software, just to try it!


I have made a tote bag, although its not really what I had in mind, it just wanted to make something with my first cutting attempt.   As I had used the HeatNBond lite, I had to sew the design on to the fabric and I think the font was a bit too fiddly, but I sewed all the way around it with my sewing machine, when I came to the flower I cheated and went around the middle and the outer edge so you can see the stitching in between the petals.


Lessons learnt:

  1. Remove the backing paper from the HeatNBond before cutting the fabric.
  2. The lightweight carrier sheet is also adhesive, (I didn't realise it had a removable film covering the sticky bit. (I had used the heavier weight carrier sheet, hence the backing paper sticking to it too much!)
  3. Don't use an over ambitious design if you intend to sew it on with a sewing machine or use the no-sew version of HeatNBond.

I have ordered some Heat Transfer Material in normal and flock to try as I have seen some nice ideas for t-shirt designs whilst blog hopping!

All in all I am quite pleased with my first project.

Sarah xx

Monday, 18 July 2011

My New Toy

It was my birthday the other week, and I ummed and arred over buying (getting my hubby to buy me) a Silhouette SD machine.   I looked at the lite version, but liked the idea of the registration mark feature which allows you to cut out things you have printed.  I mainly wanted the Silhouette to cut fabric and wanted to make sure it would do that.  Having mulled it over for some time and talked about it with hubby... he said I might as well get the full version....  I shopped around a bit and end up ordering one from CreateandCraft.tv and it arrived a few days later....   I haven't had much time to play with it yet, but have loads of ideas...  watch this space...!


Sarah xx